
Receipt organisation
How to convert receipt PDFs to a spreadsheet
Convert receipt PDFs into useful expense rows: distinguish text from scans, check totals and dates, avoid duplicates, and keep links to the originals.
· 5 min read
Converting receipt PDFs to a spreadsheet means choosing the fields you need, extracting or copying them, and checking the result. For an expense tracker, one row per purchase is usually more useful than reproducing the PDF’s entire layout.
Use the free Google Sheets expense tracker template as your destination for manual entry. It includes a blank Expenses tab, receipt-link columns and a separate worked example. If you want automated extraction, Gexpense accepts receipt PDFs and saves reviewed expenses in its own connected Google Sheet.
1. Check whether the PDF contains text or a scan
Open the PDF and try selecting the merchant name. If you can copy readable text, you may be able to transfer the date, merchant and total directly. Check the pasted result: columns and reading order do not always survive copying.
If the page is an image and you cannot select the text, use a receipt scanner with optical character recognition (OCR), or enter the fields manually. Uploading a PDF to Drive stores the document; you still need a separate step to turn its contents into expense rows.
Keep the original PDF in either case. The spreadsheet is an index of your expenses, and the original lets you resolve an incorrect amount or missing detail later.
2. Decide what counts as one expense
A three-page invoice may describe a single purchase. Three one-page receipts may represent three purchases. Count transactions before counting pages.
For a receipt-level tracker, record the final purchase total once. Do not add each line item and then add the receipt total as another expense. If one PDF contains unrelated receipts, separate it into files for individual purchases before scanning, or create and review the rows manually. Do not assume a scanner will split every combined PDF correctly.
Choose a consistent set of columns: date, merchant, description, category, amount, receipt link and notes. Add an invoice number to Notes when it helps distinguish otherwise similar purchases.
3. Work through one receipt first
Consider a fictional receipt from Little Fern Stationery dated 6 August 2026, with invoice number LF-2086 and a final total of AUD 42.80 for notebooks and packing labels. That is one expense row with a numeric amount of 42.80. In the template, the currency is recorded once in B3 for the whole tab.
The Example tab includes that receipt and two other fictional purchases: 29.00 for software and 86.40 for packaging. Their total is 158.20. This gives you a simple reference for checking the workbook before entering your own records.
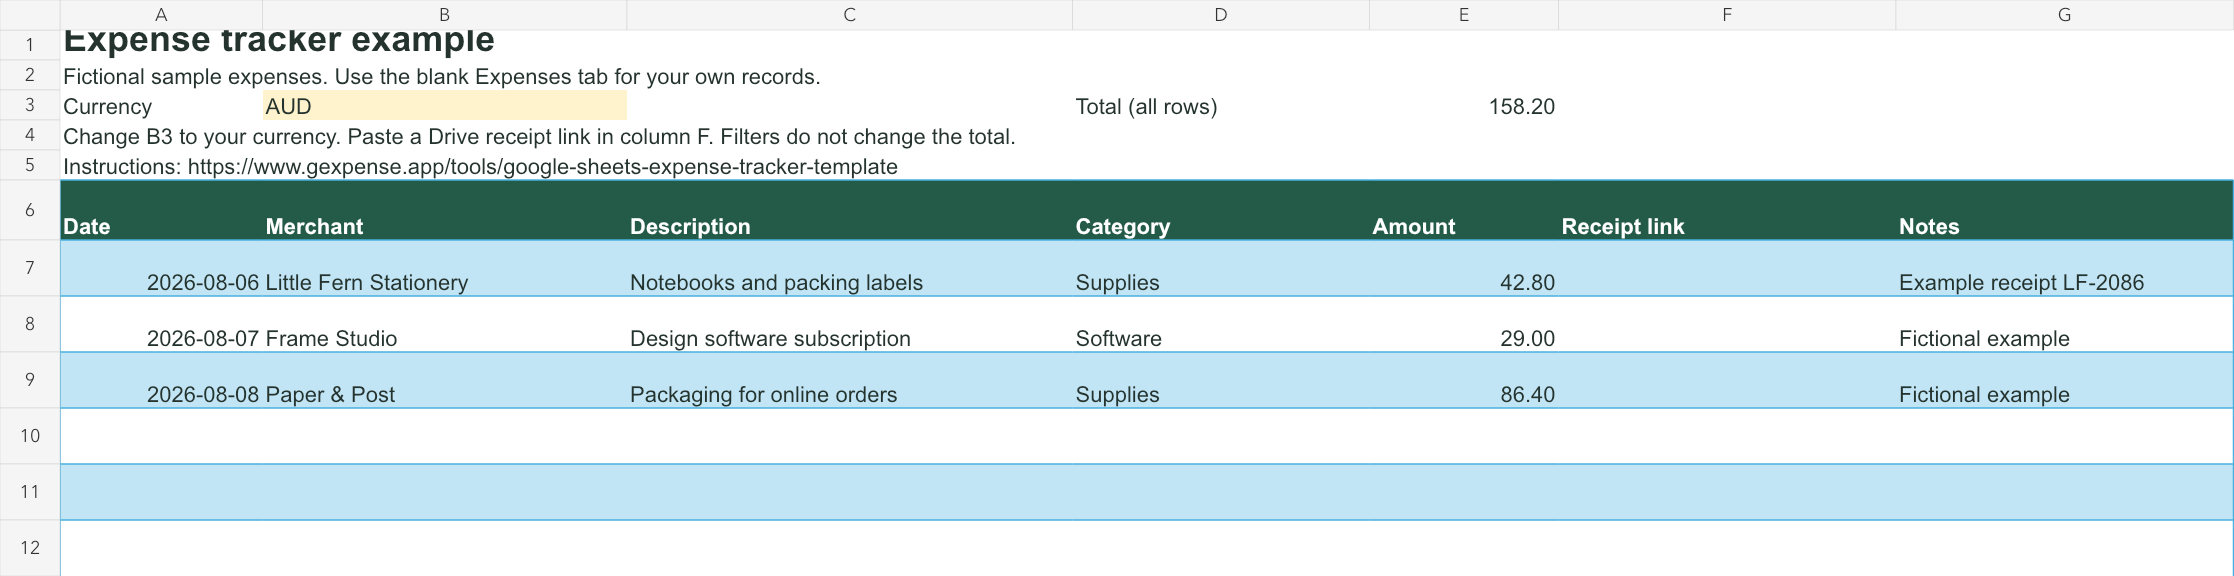
Use the blank Expenses tab for your own entries. Paste a link to the corresponding PDF into each row after uploading it to Drive. The sample receipt-link cells are deliberately empty, so you can replace them with links to files you actually own.
4. Check the fields that commonly need correction
- Total versus subtotal: record the intended purchase amount, not cash tendered, change, or a subtotal mistaken for the final total.
- Date: distinguish the purchase or invoice date from a due date. Use one consistent convention for the records you are keeping.
- Currency: keep one currency per template tab. Changing its currency label does not convert existing amounts.
- Refunds: if you track refunds as negative amounts, apply that convention consistently and link the refund document.
- Duplicates: compare the merchant, date, invoice number and total before adding a file that may already be recorded.
- Unreadable values: inspect the PDF or enter the value manually. A blank that needs review is preferable to an unchecked guess.
5. Choose a workflow for the rest of the batch
For a small batch of text-based PDFs, copying the relevant fields into the template may be enough. For scanned PDFs or repeated receipt admin, attach files to an expense in Gexpense, or use bulk import to select, scan and review a batch before saving.
Gexpense’s receipt suggestions remain editable before saving. Its connected Sheet uses the app’s own structure, so the free manual template is a separate option rather than an upload template for Gexpense. See the receipt-scanning walkthrough for an actual screenshot of the sample review interface.
6. Keep the result useful after conversion
Filter by merchant or category to review related expenses, and confirm that receipt links open for anyone you share the records with. The template’s total includes all 1,000 prepared entry rows, even when some are hidden by a filter.
If you need a CSV for another workflow, Google Sheets provides download formats under File → Download. A CSV contains a single sheet’s values rather than the full workbook’s formatting and multiple tabs; check the receiving system’s required columns before importing it. See Google’s spreadsheet export instructions.
Download the free expense tracker template, and use the Drive organisation guide to keep the original PDFs easy to find.