
Receipt organisation
How to scan receipts into Google Sheets
Turn receipt photos into reviewed expense rows in Google Sheets. Follow a worked example, keep the original in Drive, or start with a free manual template.
· 5 min read
To scan a receipt into Google Sheets, extract its date, merchant and total, check those details against the original, then save them as an expense row with a link to the receipt. Gexpense handles that workflow with files in Google Drive and records in a connected Google Sheet.
If you only have a few receipts, you can enter those fields yourself using the free Google Sheets expense tracker template. The template is a manual workbook; it does not scan images. This guide shows what to record and how the scanning workflow differs.
1. Start with a readable receipt
Photograph the receipt flat, with the merchant, date and total in frame. Avoid glare across the amount and check that small print is readable before uploading. Keep the original image so you can compare it with the extracted details later.
A receipt photo can include several numbers: a subtotal, tax, the final total, cash tendered and change. A readable image makes it easier to confirm which number belongs in your expense tracker. If the receipt arrived as a PDF, use the PDF-to-spreadsheet guide for the document-specific checks.
2. Choose manual entry or receipt scanning
For manual entry, download the template and import it into Google Sheets. Use the blank Expenses tab, set the currency in B3, and enter your first receipt in row 7. The separate Example tab shows the expected layout without adding sample amounts to your own total.
For scanning, sign in to Gexpense with Google and finish workspace setup. Gexpense connects its own expense sheet and receipt folder. Add an expense and attach the receipt: the single-expense form scans attachments automatically and suggests values for you to review. The standalone template is not the sheet structure used by the app.
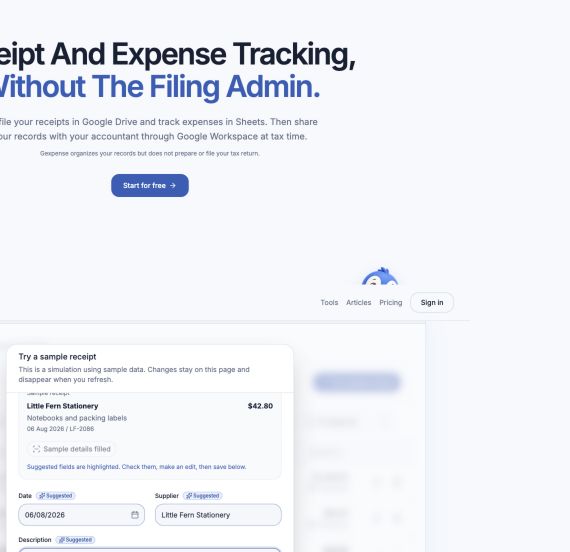
Before signing in, you can try the homepage demo. Choose Try a sample receipt, then Simulate receipt scan. It uses a fixed fictional receipt, so you can explore the review step without uploading a file.
3. Review the row against the receipt
The demo receipt is Little Fern Stationery, 6 August 2026, AUD 42.80, invoice LF-2086. Its description is “Notebooks and packing labels”. In the manual template, that becomes:
- Date: 2026-08-06, stored as a date so it can be sorted.
- Merchant: Little Fern Stationery.
- Description: Notebooks and packing labels.
- Category: Supplies.
- Amount: 42.80, entered as a number.
- Receipt link: the Drive link to your original file.
- Notes: invoice LF-2086 and any context you need later.
Check the date carefully: a value such as 06/08/2026 can be read differently across locales. Compare it with the original receipt rather than assuming the scanner interpreted it correctly. Confirm the currency as well as the amount; a dollar sign alone does not distinguish AUD from USD or NZD.
Treat the category as an organisational label. It does not decide the tax treatment of the purchase. Correct any suggested field before saving, and add a useful description if the merchant name alone will not explain the expense later.
4. Keep the original connected to the expense
With the manual template, upload the receipt to Drive, copy its link, and paste it into the Receipt link column. Keep access limited to the people who need the records. A link is useful only if the intended reader has permission to open the file.
In Gexpense, saving the reviewed expense stores the attachment in the connected Drive folder and the expense details in the connected Sheet. For a repeatable folder structure and naming routine, see how to organise receipts in Google Drive.
5. Review a batch before saving it
For several files, Gexpense’s bulk import separates selection, scanning and review. Select the batch, start scanning, then review each entry before saving. A failed scan still needs attention: fill in the missing details rather than assuming the receipt produced a complete row.
Compare merchant, date and amount across entries to catch a receipt included twice. At the end, check that each expense has its original attachment and a useful description. The goal is a row you can trace back to evidence, not just a spreadsheet full of extracted text.
Start with the free expense tracker template for manual tracking, or try Gexpense when you want receipt suggestions and automatic storage.